Social Icons

Sunday, June 28, 2015

How to upload a new template for your blog ?

Instructions for how to install them!

Up until fairly recently there was a problem with uploading a template through the new interface. It seems that what was happening was that if you had widgets installed in your site, that weren't in the template that you were uploading, the interface didn't quite know what to do with them so it threw an error message. It seems as if this issue has been fixed, but if you run into this problem, the way to get around it is by switching to the old interface by clicking on the gear icon in the top right corner. You can always switch back, but this seems to be a good workaround.

1: Download your new template

You can download templates from anywhere, they just need to be written for Blogger, have the necessary elements, and be valid/strict XML format. Download the provided XML file and save it to your desktop (or other easy-to-find location).

2: Make a backup!


Head to your Blogger dashboard page and click on Template in the navigation column. In the top right you'll see a button that says "Backup / Restore"; click on that button. An overlay window will show up with two options, one for downloading a backup and one for uploading a template. See that big orange button that says "download full template"? Click on it!

Save the provided XML file somewhere on your computer. You will need this if it turns out you don't like the new template and want to revert back; there is no other way to revert back! I also recommend adding the date into your template file's name so that you can revert back to a version of your template if you need to (this is assuming you're not using any kind of version/source control, if so don't worry about this). You might save the file with a name such as template-2012-09-08.xml as an example.


3: Install the template


Once you've saved a copy of your existing template, use the second option in that overlay window by clicking on the "browse" button. Use the finder to select the new template from your desktop (or wherever you saved it in Step #1), then click on the orange "Upload" button.

Your new template should be installed! 

How to converting your blog Posts in to a book ?

I am always up for a new challenge. This post is posted by me ( Mohit Raiyani ) and i am wanted to transform my blog into a book.

1   Getting an export of your blog's contants :
        → The best way to get all of your content out of Blogger is by using a site called the Data Liberation Front. Now you  Go here to grab your content out of one of your blogs (by clicking on Configure then Create Archive). You will receive a ZIP file from this export which contains a file inside such as YourBlogName.atom.

2   Rename the file
        → Open up the ZIP file and drag the YourBlogName.atom file into a folder on your desktop. Rename the file from YourBlogName.atom to YourBlogName.xml

3   Download the style sheet and xsl template
        → Download 
this style sheet and this XSL template and save them in the same directory with your new YourBlogName.xml file.

4   Edit one line in the XML file in a text editor
        → Open the XML file in a text editor and change:
            <?xml-stylesheet href="http://www.blogger.com/styles/atom.css" type="text/css"?>
            to be
            <?xml-stylesheet href="transform.xsl" type="text/xsl"?>

5   Drag the XML file into either the Safari or Internet Explorer browsers
        → Yes, Safari browser or Internet Explorer browser. Chrome and Firefox might try to apply their own default styling to the XML file, so it works beset in these other two browsers.


        → The XSL file we've set up is set to do the following transformation:
            <h1>Post title</h1>
            <h2>Post author</h2>
            <h3>Post date</h3>
            Blog post content

        → It does this in reverse order, so it's going from Oldest to Newest posts. If you'd like you can change this to be ascending in the XSL file, and you can add more to the XSL file if you'd like to bring in comments, but we figure this is enough for most. It will also load in external images for the blog posts.


6   Select all and copy paste into Word
        → This might be a bit tough depending on how big your blog is, but we were able to do a 12 meg blog archive pretty easily. Simply select all, copy, then open a new Word document and hit paste. You might need to wait a bit, but it will work.

7   Save the Word document
        → Save the document before you start working on it! Once saved, you can edit to your heart's content, resizing images, moving them around, reformatting... everything. Links and images are all preserved as well as much of the formatting.

Responsive JS / CSS Animated Menu for Responsive Website

We working on a website and developing toggle menu for Responsive website design only.

Demo here.


Source Code || Download Here

<style>
#toggle {
 position: absolute;
 height: 45px;
 width: 45px;
 cursor: pointer;
} #toggle .ham-bar {
 position: absolute;
 left: 0;
 height: 4px;
 width: 39px;
 margin: 0;
 background-color: #74c3f0;
 border-radius: 0;
 background-clip: padding-box;
    -webkit-transition: all 0.4s;
    -moz-transition: all 0.4s;
    -o-transition: all 0.4s;
    transition: all 0.4s;
} #toggle .ham-bar.ham-bar-one {
 top: 12px;
 transform: translateY(0px) rotateZ(0deg);
 -ms-transform: translateY(0px) rotateZ(0deg);
 -webkit-transform: translateY(0px) rotateZ(0deg);
 -moz-transform: translateY(0px) rotateZ(0deg);
 -o-transform: translateY(0px) rotateZ(0deg);
} #toggle .ham-bar.ham-bar-two {
 top: 21px;
 opacity: 1;
 display: inline;
} #toggle .ham-bar.ham-bar-three {
 top: 30px;
 transform: translateY(0px) rotateZ(0deg);
 -ms-transform: translateY(0px) rotateZ(0deg);
 -webkit-transform: translateY(0px) rotateZ(0deg);
 -moz-transform: translateY(0px) rotateZ(0deg);
 -o-transform: translateY(0px) rotateZ(0deg);
} #toggle.crisscross .ham-bar.ham-bar-one {
 transform: translateY(9px) rotateZ(45deg);
 -ms-transform: translateY(9px) rotateZ(45deg);
 -webkit-transform: translateY(9px) rotateZ(45deg);
 -moz-transform: translateY(9px) rotateZ(45deg);
 -o-transform: translateY(9px) rotateZ(45deg);
} #toggle.crisscross .ham-bar.ham-bar-two {
 opacity: 0;
 display: none;
} #toggle.crisscross .ham-bar.ham-bar-three {
 transform: translateY(-9px) rotateZ(-45deg);
 -ms-transform: translateY(-9px) rotateZ(-45deg);
 -webkit-transform: translateY(-9px) rotateZ(-45deg);
 -moz-transform: translateY(-9px) rotateZ(-45deg);
 -o-transform: translateY(-9px) rotateZ(-45deg);
}
</style>

<script type='text/javascript'>//<![CDATA[

// this uses JQuery since we're assuming most sites use it, 
//but can easily be changed to use any other identifier

$('#toggle').click(function() {
  $('#toggle').toggleClass("crisscross");
});
//]]></script>

<div id="toggle">
 <span class="ham-bar ham-bar-one"></span>
 <span class="ham-bar ham-bar-two"></span>
 <span class="ham-bar ham-bar-three"></span>
</div>


Friday, June 26, 2015

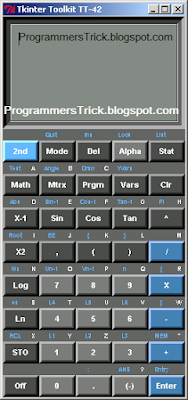
Python : A Calculator

  • How to Make a Calculator in Python ?
  • Calculator Application in Python ?
  • Source code of Calculator


Python Calculator Source Code :

from Tkinter   import *
import Pmw, string

class SLabel(Frame):
    """ SLabel defines a 2-sided label within a Frame. The
        left hand label has blue letters the right has white letters """
    def __init__(self, master, leftl, rightl):
        Frame.__init__(self, master, bg='gray40')
        self.pack(side=LEFT, expand=YES, fill=BOTH)
        Label(self, text=leftl, fg='steelblue1',
                     font=("arial", 6, "bold"), width=5, bg='gray40').pack(
                         side=LEFT, expand=YES, fill=BOTH)
        Label(self, text=rightl, fg='white',
                     font=("arial", 6, "bold"), width=1, bg='gray40').pack(
                         side=RIGHT, expand=YES, fill=BOTH)

class Key(Button):
    def __init__(self, master, font=('arial', 8, 'bold'), 
                 fg='white',width=5, borderwidth=5, **kw):
        kw['font'] = font
        kw['fg'] = fg
        kw['width'] = width
        kw['borderwidth'] = borderwidth
        apply(Button.__init__, (self, master), kw)
        self.pack(side=LEFT, expand=NO, fill=NONE)
        
class Calculator(Frame):
    def __init__(self, parent=None):
        Frame.__init__(self, bg='gray40')
        self.pack(expand=YES, fill=BOTH)
        self.master.title('Tkinter Toolkit TT-42')
        self.master.iconname('Tk-42')
        self.calc = Evaluator()        # This is our evaluator
        self.buildCalculator()         # Build the widgets
        # This is an incomplete dictionary - a good exercise!
        self.actionDict = {'second': self.doThis, 'mode':    self.doThis,
                           'delete': self.doThis, 'alpha':   self.doThis,
                           'stat':   self.doThis, 'math':    self.doThis,
                           'matrix': self.doThis, 'program': self.doThis,
                           'vars':   self.doThis, 'clear':   self.clearall,
                           'sin':    self.doThis, 'cos':     self.doThis,
                           'tan':    self.doThis, 'up':      self.doThis,
                           'X1':     self.doThis, 'X2':      self.doThis,
                           'log':    self.doThis, 'ln':      self.doThis,
                           'store':  self.doThis, 'off':     self.turnoff,
                           'neg':    self.doThis, 'enter':   self.doEnter,
                           }
        self.current = ""
                           
    def doThis(self,action):
        print '"%s" has not been implemented' % action
        
    def turnoff(self, *args):
        self.quit()

    def clearall(self, *args):
        self.current = ""
        self.display.component('text').delete(1.0, END)

    def doEnter(self, *args):
        result = self.calc.runpython(self.current)
        if result:
            self.display.insert(END, '\n')
            self.display.insert(END, '%s\n' % result, 'ans')
        self.current = ""
         
    def doKeypress(self, event):
        key = event.char
        if not key in ['\b']:
            self.current = self.current + event.char
        if key == '\b':
            self.current = self.current[:-1]
              
    def keyAction(self, key):
        self.display.insert(END, key)
        self.current = self.current + key
         
    def evalAction(self, action):
  try:
            self.actionDict[action](action)
  except KeyError:
            pass

    def buildCalculator(self):
        FUN   = 1            # Designates a Function
        KEY   = 0            # Designates a Key
        KC1   = 'gray30'     # Dark Keys
        KC2   = 'gray50'     # Light Keys
        KC3   = 'steelblue1' # Light Blue Key
        KC4   = 'steelblue'  # Dark Blue Key
        keys = [
            [('2nd',  '',     '',  KC3, FUN, 'second'),  # Row 1
             ('Mode', 'Quit', '',  KC1, FUN, 'mode'),
             ('Del',  'Ins',  '',  KC1, FUN, 'delete'),
             ('Alpha','Lock', '',  KC2, FUN, 'alpha'),
             ('Stat', 'List', '',  KC1, FUN, 'stat')],
            [('Math', 'Test', 'A', KC1, FUN, 'math'),    # Row 2
             ('Mtrx', 'Angle','B', KC1, FUN, 'matrix'),
             ('Prgm', 'Draw', 'C', KC1, FUN, 'program'),
             ('Vars', 'YVars','',  KC1, FUN, 'vars'),
             ('Clr',  '',     '',  KC1, FUN, 'clear')],        
            [('X-1',  'Abs',  'D', KC1, FUN, 'X1'),      # Row 3
             ('Sin',  'Sin-1','E', KC1, FUN, 'sin'),
             ('Cos',  'Cos-1','F', KC1, FUN, 'cos'),
             ('Tan',  'Tan-1','G', KC1, FUN, 'tan'),
             ('^',    'PI',   'H', KC1, FUN, 'up')],
            [('X2',   'Root', 'I', KC1, FUN, 'X2'),      # Row 4
             (',',    'EE',   'J', KC1, KEY, ','),
             ('(',    '{',    'K', KC1, KEY, '('),
             (')',    '}',    'L', KC1, KEY, ')'),
             ('/',    '',     'M', KC4, KEY, '/')],
            [('Log',  '10x',  'N', KC1, FUN, 'log'),     # Row 5
             ('7',    'Un-1', 'O', KC2, KEY, '7'),
             ('8',    'Vn-1', 'P', KC2, KEY, '8'),
             ('9',    'n',    'Q', KC2, KEY, '9'),
             ('X',    '[',    'R', KC4, KEY, '*')],
            [('Ln',   'ex',   'S', KC1, FUN, 'ln'),      # Row 6
             ('4',    'L4',   'T', KC2, KEY, '4'),
             ('5',    'L5',   'U', KC2, KEY, '5'),
             ('6',    'L6',   'V', KC2, KEY, '6'),
             ('-',    ']',    'W', KC4, KEY, '-')],
            [('STO',  'RCL',  'X', KC1, FUN, 'store'),   # Row 7
             ('1',    'L1',   'Y', KC2, KEY, '1'),
             ('2',    'L2',   'Z', KC2, KEY, '2'),
             ('3',    'L3',   '',  KC2, KEY, '3'),
             ('+',    'MEM',  '"', KC4, KEY, '+')],
            [('Off',  '',     '',  KC1, FUN, 'off'),     # Row 8
             ('0',    '',     '',  KC2, KEY, '0'),
             ('.',    ':',    '',  KC2, KEY, '.'),
             ('(-)',  'ANS',  '?', KC2, FUN, 'neg'),
             ('Enter','Entry','',  KC4, FUN, 'enter')]]

        self.display = Pmw.ScrolledText(self, hscrollmode='dynamic',
                      vscrollmode='dynamic', hull_relief='sunken',
                      hull_background='gray40', hull_borderwidth=10, 
                      text_background='honeydew4', text_width=16,
                      text_foreground='black', text_height=6,
          text_padx=10, text_pady=10, text_relief='groove',
                      text_font=('arial', 12, 'bold'))
        self.display.pack(side=TOP, expand=YES, fill=BOTH)
        self.display.tag_config('ans', foreground='white')
        self.display.component('text').bind('<Key>', self.doKeypress)
        self.display.component('text').bind('<Return>', self.doEnter)

        for row in keys:
            rowa = Frame(self, bg='gray40')
            rowb = Frame(self, bg='gray40')
            for p1, p2, p3, color, ktype, func in row:
                if ktype == FUN:
                    a = lambda s=self, a=func: s.evalAction(a)
                else:
                    a = lambda s=self, k=func: s.keyAction(k)
                SLabel(rowa, p2, p3)
                Key(rowb, text=p1, bg=color, command=a)
            rowa.pack(side=TOP, expand=YES, fill=BOTH)
            rowb.pack(side=TOP, expand=YES, fill=BOTH)            
 
class Evaluator:
    def __init__(self):
        self.myNameSpace = {} 
        self.runpython("from math import *")

    def runpython(self, code):
        try:
            return 'eval(code, self.myNameSpace, self.myNameSpace)'
        except SyntaxError:
            try:
                exec code in self.myNameSpace, self.myNameSpace
            except:
                return 'Error'

Calculator().mainloop()

Tag :  Python     Applcation     Program 

Thursday, June 25, 2015

C# : Efficiently Looping Over An Array

This Tricks can improve the speed of programs that spend a lot of time looping over arrays.

Propably you know from experience, that when you try to access an invalid array element (say, index 11 in an array of size 10) you will get an IndexOutOfRangeException. To be able to generate this exception and prohibit the dangerous access of memory beyond your array storage, the runtime performs an array bounds check everytime you access an array, which checks that the index you supply is lower then the array size.

For example, take a look at this code:


int count = 0;
int[] array = new int[10];
// omitted: fill array with some values
for (int i = 0; i < 10; i++)
    count += array[i];

Here, we simply loop over all elements of the array and add them together.
But what the compiler actually produces looks something like the result of this code:

for (int i = 0; i < 10; i++)
{
    if (i >= array.Length)
        throw new IndexOutOfRangeException();
    count += array[i];
}

Now the hidden cost is only a simple if expression for each array access, but if you have many or very large arrays which get looped over often, it can add up.

But there are two ways to let the compiler skip the bounds checks and speed up array code:

The first way is to use Array.Length as the upper bound of the loop variable, and use the unmodified loop variable to index the array:

for (int i = 0; i < array.Length; i++)
    count += array[i];

The second way is to loop over the array with foreach:
foreach (int x in array)
    count += x;

In both cases, the compiler can be sure that the array index will never be outside its bounds, and skip the bounds check.